Home » Solar Panels for Campervans: Real UK Owner Experiences & Honest Costs
Solar Panels for Campervans: Real UK Owner Experiences & Honest Costs
Let’s talk about solar panels for campervans. Not the glossy Instagram version where everything’s perfect and sunny. The real British version where it rains in July and you’re wondering if those expensive panels on your roof are actually doing anything.
We’ve spoken to dozens of van owners, installed panels ourselves, and monitored performance through four British winters. Here’s what we’ve learned about solar panels when you’re travelling the UK in a campervan.
Is Solar Actually Worth It in UK Weather?
Short answer: Yes, but manage your expectations.
Long answer: British weather isn’t terrible for solar. Surprising, right? We’re not Spain, but we’re not living in permanent darkness either. The UK gets around 1,400 hours of sunshine per year. That’s actually enough to make solar worthwhile.
What solar panels CAN do in the UK:
- Keep your leisure battery topped up during summer
- Extend your off-grid camping from 2-3 days to a week or more
- Reduce reliance on hookup sites
- Cover basic electrical needs (lights, phone charging, water pump)
- Provide trickle charging when the van’s parked up
What solar panels CANNOT do in the UK:
- Replace hookup completely year-round
- Power high-energy devices like kettles or hairdryers
- Guarantee full battery charge on cloudy days
- Work well in winter (November to February is pretty grim)
- Charge a completely flat battery in one day
The reality: If you wild camp regularly or take extended trips away from hookup sites, solar panels are brilliant. If you mainly use campsites with hookup, they’re a nice-to-have rather than essential.
Wattage Calculator: What Size Do You Actually Need?
Right, let’s work out your power needs without making this complicated.
Step 1: Calculate Your Daily Usage
Here’s what typical van devices use per day:
LED lights (5 hours use) = 10-15Ah Water pump (30 mins total) = 5Ah Phone charging (2 phones) = 5Ah Laptop (2 hours) = 20Ah Fridge (24 hours) = 40-60Ah Diesel heater (4 hours) = 8Ah
Light usage (just basics): 30-40Ah per day Moderate usage (basics plus laptop/tablet): 60-80Ah per day Heavy usage (everything running): 100-120Ah per day
Step 2: Match Panel Size to Usage
100W panel in British summer:
- Good day: 30-40Ah
- Average day: 20-30Ah
- Cloudy day: 10-15Ah
- Winter day: 5-10Ah
200W panel in British summer:
- Good day: 60-80Ah
- Average day: 40-50Ah
- Cloudy day: 20-30Ah
- Winter day: 10-20Ah
300W panel in British summer:
- Good day: 90-120Ah
- Average day: 60-80Ah
- Cloudy day: 30-50Ah
- Winter day: 15-30Ah
The Sweet Spot for Most UK Vans
100-150W: Covers lights, phone charging, and water pump. Good for weekend warriors or summer camping.
200W: Handles moderate usage including a fridge. Sweet spot for most people doing regular trips.
300W+: For full-timers or heavy users with big battery banks. Overkill for weekend camping.
Our recommendation: Start with 200W if you’ve got roof space. It’s the Goldilocks option – not too little, not too much.
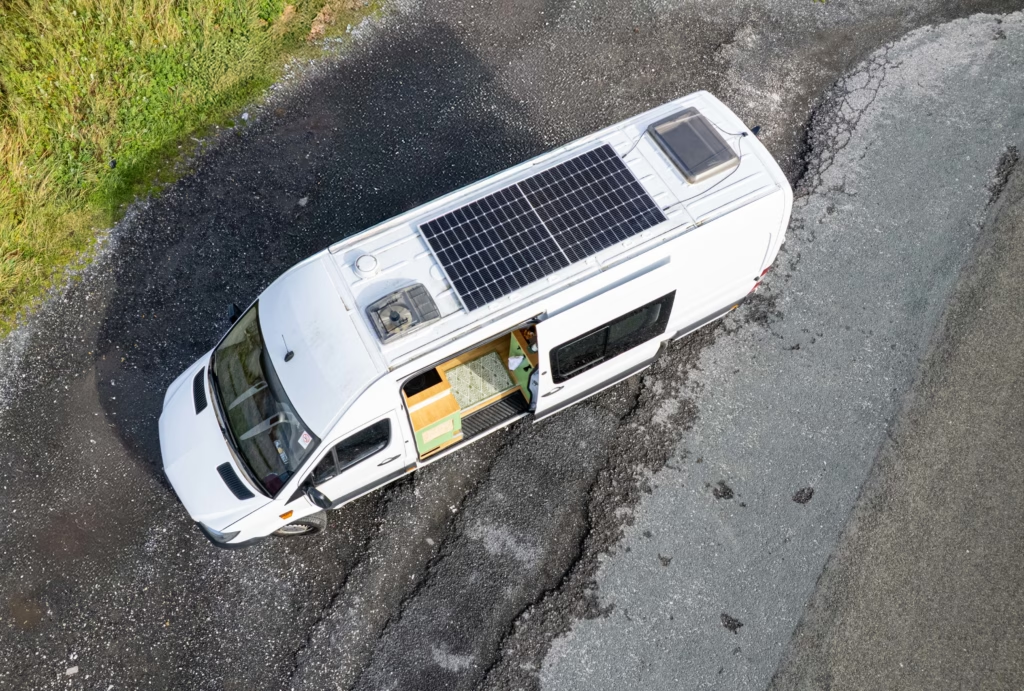
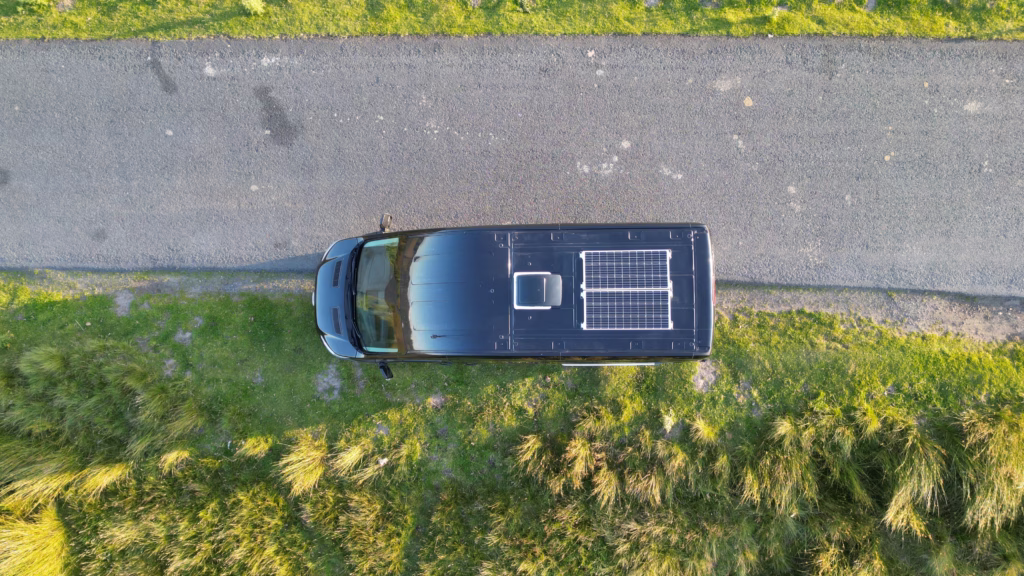
Rigid vs Flexible Panels: The Honest Comparison
Two main types. Both work. Both have trade-offs.
Rigid Panels (The Standard Choice)
What they are: Traditional solar panels with aluminium frames and glass fronts. Mounted on brackets above your roof.
Pros:
- More efficient (typically 18-22% efficiency)
- Last longer (20-25 years)
- Better in hot weather (they run cooler)
- Easier to replace if damaged
- Can angle them for better performance
- Cheaper per watt
Cons:
- Heavier (6-8kg for 100W)
- More wind resistance (affects fuel economy slightly)
- Take up more vertical space
- More obvious (if you care about stealth camping)
- Installation requires drilling roof
Cost: £100-200 for 100W, £250-400 for 200W
Best for: Permanent installations, van conversions, anyone wanting maximum efficiency and longevity.
Flexible Panels (The Sleek Option)
What they are: Thin, bendy panels that stick directly onto your roof. Look much neater.
Pros:
- Lighter (2-3kg for 100W)
- Lower profile (better aerodynamics)
- Easier installation (stick-on or minimal drilling)
- Look better aesthetically
- Can fit curved roofs
- Less wind noise
Cons:
- Less efficient (typically 15-18% efficiency)
- Shorter lifespan (5-10 years)
- Run hotter (reduces performance)
- Difficult to replace without damaging roof
- Can’t angle them
- More expensive per watt
Cost: £150-250 for 100W, £350-500 for 200W
Best for: Low-profile installations, curved roofs, temporary setups, or if aesthetics matter to you.
What We Actually Use
We’ve got 200W of rigid panels on brackets. They’re efficient, they’ll last forever, and we can tilt them towards the sun when we’re parked up. Yes, they’re a bit taller. No, we don’t care. Performance beats aesthetics when you’re trying to charge a battery on a grey November day.
Most van owners choose rigid panels. They’re the sensible option. Flexible panels look gorgeous on Instagram, but rigid panels work better in British weather.
Installation Reality Check
Installing solar panels isn’t technically difficult, but it’s proper work. Here’s what’s actually involved.
DIY Installation (What You’re Taking On)
Skills needed:
- Basic drilling (through metal and fiberglass)
- Cable routing through the van
- Electrical connections (crimping, soldering)
- Sealant application (stopping leaks)
- Basic understanding of electrics
Tools needed:
- Drill and metal drill bits
- Step drill bit (for cable entry)
- Cable crimper
- Sikaflex or similar sealant
- Cable glands
- Multimeter
- Basic hand tools
Time required:
- First time: 6-8 hours
- If you know what you’re doing: 3-4 hours
Difficulty: Moderate. The wiring isn’t complicated, but drilling holes in your roof is nerve-wracking. One wrong hole and you’ve got a leak.
Common mistakes:
- Not using enough sealant (hello leaks)
- Cable too short or trapped incorrectly
- Wrong fuse size for the system
- Panels wired in parallel when they should be series (or vice versa)
- Poor earthing causing interference
Professional Installation
Cost: £300-600 for installation (on top of equipment)
What you get:
- No stress about drilling your roof
- Proper weatherproofing
- Clean cable routing
- Guaranteed workmanship
- Usually includes testing and setup
Worth it? If you’re not confident with electrics or drilling, yes. One leak ruins your weekend and costs more than installation to fix. If you’re handy and done research, DIY is fine.
Our experience: We DIY’d ours. Took a whole Saturday, involved a lot of swearing, but saved £400. Would we do it again? Probably, but we’d watch more YouTube tutorials first.
Cost Breakdown: What You’ll Actually Spend
Let’s talk real money. Not “you can get panels for £50 on eBay” nonsense. Actual functional systems.
Budget Setup (100W, Basic Components)
- Solar panel (100W rigid): £120
- MPPT charge controller: £50
- Mounting brackets: £25
- Cable and connectors: £30
- Sealant and fixings: £20
- Total: £245
Good for: Light use, small battery, weekend camping.
Standard Setup (200W, Quality Components)
- Solar panels (2×100W rigid): £280
- MPPT charge controller: £90
- Mounting brackets: £40
- Cable and connectors: £50
- Roof entry gland: £15
- Sealant and fixings: £30
- Total: £505
Good for: Most people’s needs, year-round use, moderate power requirements.
Premium Setup (300W, Top Components)
- Solar panels (3×100W or 2×150W): £450
- High-end MPPT controller: £150
- Adjustable mounting brackets: £80
- Quality cable and connectors: £70
- Roof entry kit: £25
- Professional sealant: £40
- Total: £815
Good for: Full-timers, heavy users, large battery banks, winter camping.
Add Professional Installation
Budget: +£300 Standard: +£400 Premium: +£500
Our Recommendation
For weekend/holiday use: 200W standard setup. Sweet spot of performance and cost.
For regular/full-time use: 300W premium setup if roof space allows.
For occasional use: 100W budget setup keeps battery topped up between trips.
Winter Performance Truth (Nobody Wants to Admit This)
Right, time for honesty. Winter solar in the UK is pretty disappointing.
Summer Performance (May-September)
100W panel average: 25-30Ah per day 200W panel average: 50-60Ah per day
This is brilliant. You can wild camp for a week and barely touch your battery.
Winter Performance (November-February)
100W panel average: 5-10Ah per day 200W panel average: 10-20Ah per day
This is… not brilliant. Barely covers your lights and phone charging.
Why Winter Is Hard
Shorter days: 7-8 hours of potential sunlight vs 15-16 in summer Lower sun angle: Panels at 30° lose about 40% efficiency in winter More clouds: British winter is grey. Constantly. Dirt and leaves: Stuff accumulates on panels when it’s wet
Winter Solar Reality Check
If you’re camping in winter, solar panels help but won’t carry you. You need:
- Bigger battery capacity
- Regular driving to charge via alternator
- Hookup for extended stays
- Lower power consumption
- Realistic expectations
The truth: Winter solar is better than nothing, but it’s supplementary. Don’t expect miracles from November to February.
Spring/Autumn (The Sweet Spot)
March-April and September-October are actually brilliant. Enough daylight, not too hot, panels perform well. These months make solar worthwhile.
Maintenance Needs (Easier Than You Think)
Solar panels are low maintenance, but not zero maintenance.
Regular Maintenance (Every Few Months)
1. Clean the panels – Dirt, bird droppings, and tree sap reduce efficiency. Warm water and a soft cloth. Don’t use abrasive cleaners.
2. Check connections – Make sure nothing’s worked loose. Particularly after rough roads or high winds.
3. Inspect sealant – Check around mounting brackets and cable entries. Reseal if you spot any cracks.
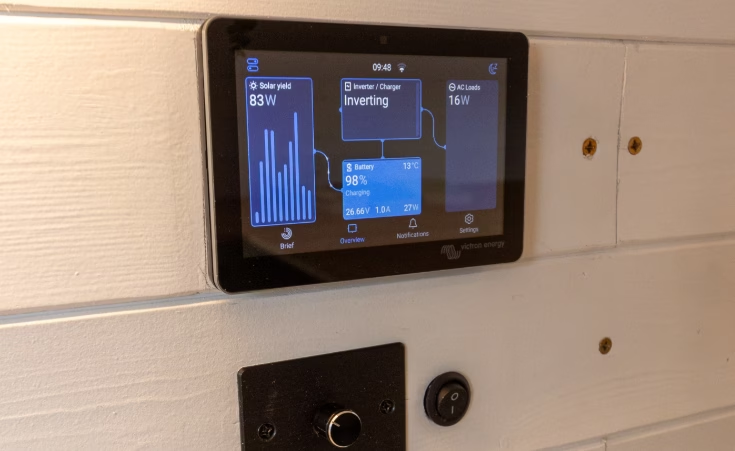
4. Monitor performance – Keep an eye on charge controller readings. Sudden drops suggest a problem.
Annual Maintenance
5. Deep clean – Proper wash of panels and mounting brackets.
6. Check cable condition – Look for chafing, cracking, or UV damage.
7. Tighten all fixings – Vibration loosens things over time.
Troubleshooting Common Issues
Panels not charging:
- Check connections (most common issue)
- Verify charge controller is working
- Test panel voltage with multimeter
- Check for blown fuses
Reduced performance:
- Clean panels thoroughly
- Check for shading (even partial shade kills performance)
- Verify wiring hasn’t been damaged
- Check battery isn’t already full
Weird readings:
- Reset charge controller
- Check all connections are tight
- Verify battery terminals are clean
Our experience: We’ve had solar for three years. Maintenance is about 30 minutes every three months. Mostly just cleaning and checking nothing’s come loose. It’s genuinely low-effort.
5 Real Owner Case Studies
We asked actual van owners about their solar experiences. Here’s what they told us.
Case Study 1: Sarah – Weekend Warrior
Van: VW T5 conversion System: 100W rigid panel, 110Ah AGM battery Usage: Weekend trips, mainly summer Installation: Professional (£420 total)
Her experience: “Honestly, it’s perfect for what I need. Keeps the battery topped up between trips and covers my lights and phone charging when I’m away. Winter’s a bit naff but I mostly use hookup sites then anyway. Wouldn’t bother with more than 100W for occasional use.”
ROI: “Saves me maybe £3-5 per trip in hookup fees. Will take about 3-4 years to pay for itself, but the convenience is worth it. Not worrying about battery levels is huge.”
Case Study 2: Mike & Jenny – Full-Time Van Lifers
Van: Sprinter conversion System: 400W rigid (4×100W), 300Ah lithium battery Usage: Living in van full-time, year-round Installation: DIY (£1,200 total for panels and lithium)
Their experience: “Total game-changer. We’re off-grid 80% of the time. Summer’s amazing – battery’s full by midday. Winter’s tougher but still manageable. We added 200W more after the first year because we were running a fridge, laptop, and lights constantly. Best investment we made.”
ROI: “We calculated we save about £400-500 per year in campsite fees. System paid for itself in 2.5 years. Now it’s pure saving.”
Case Study 3: Tom – Budget Setup
Van: Old Transit conversion System: 80W flexible panel, 75Ah leisure battery Usage: Summer festivals and occasional trips Installation: DIY (£180 total)
His experience: “Went budget because I wasn’t sure I’d use it much. It’s… fine? Keeps the battery from dying but I can’t run much off it. Wish I’d spent another £100 for 100W rigid instead of the cheap flexible one. It’s not terrible but it’s not great either.”
ROI: “Hasn’t really saved me money because I still use hookup most of the time. But it’s nice to have the option of parking up for free occasionally.”
Case Study 4: Rachel – The Upgrader
Van: Vivaro camper System: Started with 100W, now 200W, 200Ah battery Usage: Regular weekend trips and summer holidays Installation: First 100W professional, added second panel DIY (£850 total)
Her experience: “Started small to test it out. Loved it so much I added another 100W panel six months later and doubled my battery. Now I can run my compressor fridge comfortably and still have power for everything else. Should’ve just gone 200W from the start.”
ROI: “The upgrade approach probably cost me an extra £150 vs doing it all at once. But I learned loads and I’m confident in the system now. Worth it for the knowledge.”
Case Study 5: David – The Skeptic Converted
Van: Mazda Bongo System: 150W rigid panel, 110Ah AGM battery Usage: Touring holidays, 2-3 weeks at a time Installation: Professional (£580 total)
His experience: “Didn’t think I’d need it because we planned to use campsites. First trip to Scotland changed my mind – found some amazing wild spots and could actually stay there. Now we actively avoid hookup sites in summer. Winter we still need hookup but summer’s completely off-grid.”
ROI: “Pays for itself in saved campsite fees. Plus we stay in better locations. The freedom is worth way more than the money.”
Common Themes from All Owners
✅ Wish they’d done it sooner ✅ Summer performance exceeds expectations ✅ Winter performance disappoints ✅ Most started too small and upgraded ✅ The freedom is worth more than the money ✅ Professional installation removes stress ✅ DIY is doable but nerve-wracking

ROI Timeline: When Does It Pay for Itself?
Let’s be realistic about return on investment.
Scenario 1: Regular Wild Camper
- System cost: £500
- Hookup cost avoided: £5 per night × 40 nights per year = £200/year
- ROI: 2.5 years
Scenario 2: Occasional User
- System cost: £500
- Hookup cost avoided: £5 per night × 15 nights per year = £75/year
- ROI: 6.7 years
Scenario 3: Full-Timer
- System cost: £1,200
- Hookup cost avoided: £5 per night × 150 nights per year = £750/year
- ROI: 1.6 years
The Non-Financial ROI
What you can’t put a price on:
- Parking in beautiful wild spots without worrying about power
- Not being tied to campsite schedules
- Silence (no generator needed)
- Environmental benefits
- Peace of mind about battery levels
- Freedom to change plans spontaneously
Our take: If you’re calculating ROI purely on money, you probably don’t need solar panels. If you value freedom and off-grid capability, it pays for itself immediately.
Common Questions About Van Solar Panels
Do I need planning permission? No. Solar panels on vehicles are exempt. Just don’t make your van so tall it won’t fit in car parks.
Will it affect my insurance? Depends on the insurer. Most don’t care about solar panels under 400W. Some consider it a modification. Check with your provider. More in our campervan insurance guide.
Can I add more panels later? Yes, if your charge controller can handle it. Check the controller’s max input voltage and current.
Do I need a special battery? No. Solar works with any leisure battery. Lithium charges faster and lasts longer, but AGM is fine.
Will solar charge a completely flat battery? Eventually, but very slowly. Solar is for maintaining and topping up, not recovering dead batteries.
How long do solar panels last? Rigid panels: 20-25 years with minimal degradation Flexible panels: 5-10 years Charge controllers: 10-15 years
What happens if a panel breaks? Replace it. Panels are modular. You can swap one without replacing the whole system.
Can I use solar and hookup together? Yes. Most charge controllers handle both simultaneously. The system takes power from wherever it’s available.
Is Solar Right for You?
Get solar panels if:
- You wild camp regularly
- You take trips longer than 3-4 days
- You hate being tied to campsite schedules
- You want energy independence
- You have decent roof space
- You’re comfortable with the upfront cost
- You mainly camp spring to autumn
Don’t bother if:
- You only use campsites with hookup
- You camp exclusively in winter
- Your trips are just weekends
- You have a tiny roof (like a tiny camper)
- Budget is extremely tight
- You rarely use your van
Consider it carefully if:
- You’re a new van owner (maybe hire first to work out your needs)
- You’re doing a budget conversion
- Your battery bank is very small (75Ah or less)
- You only camp occasionally
Our Final Verdict on Van Solar Panels
Three years in, we don’t regret installing solar panels for a second. Yes, they cost money upfront. Yes, winter performance is disappointing. Yes, you could manage without them.
But the freedom they provide changes how you use your van. You stop thinking “where can I find hookup?” and start thinking “where do I actually want to go?”
For UK campervan travel, 200W of rigid solar panels with a decent MPPT controller is the sweet spot. Enough power for real-world use, not so much that you’ve wasted money and roof space.
If you’re converting your own van, budget for solar from the start. If you’re hiring, look for vans with solar panels fitted – they open up so many more camping options.
British weather isn’t perfect for solar. But it’s good enough. And “good enough” beats being chained to hookup sites any day.
Ready to explore off-grid? Check our guides to wild camping, Scottish road trips, or hiring a campervan to see where solar panels could take you.
Related posts
Let’s talk about showers in campervans. Everyone who converts a van thinks they need one. Then they built it, used it twice, and wondered …
Right, let’s talk about campervan electrics without making your brain hurt. We promise – no complicated diagrams, no technical jargon you need a dictionary …

Living in a campervan means getting creative with every square inch. We’ve tested countless storage solutions over the years, and here’s what actually works …